

Why you can trust TechRadar
We spend hours testing every product or service we review, so you can be sure you’re buying the best. Find out more about how we test.
The Creality Hi is an exceptionally well thought-out and robust 3D printer, with its traditional bed slinger design, which offers a very cheap single filament or multifilament option. Just a few years ago, this would have been exceptional value for money, but these days, we have Bambu Lab to consider, with their strong range of 3D printers also offering outstanding quality and features for a similar budget price. Any new printer has to use those as a benchmark for quality.
When it comes to quality, it stands up well, with Creality essentially going back to the drawing board and coming back with the Creality Hi, which features an all-metal build and is one of the most robust 3D printers that I’ve ever looked at in this sector. It also features a full-colour touchscreen LCD that really does go in-depth into the options and settings, making it extremely easy for both beginners and more experienced users to navigate.
The Creality Print and software, based on PrusaSlicer, is exceptionally good. Whilst you don’t have access to the full range of features, if you do want that, then you can always set up your own profiles in Prusa itself. However, what’s on offer for this level of printer is exceptional and all relatively easy to use.
In use, using the Creality filament system (CFS) and those four filaments, all work exceptionally well, and after several days’ worth of prints and the printer running non-stop, I was impressed with the general reliability.
However, I had a human error issue as I fed some old PLA-CF filament into the system without updating the settings and instantly clogged the head. Unlike other systems, which are quick and easy to resolve, here, the head needs to be dismantled before the nozzle needle can be used to push out the filament. The process was easy enough but a little more involved than many other systems; still, Creality had a video guide on how to do it, so even complete beginners should be able to easily follow the process.
I’ve reviewed all the best 3D printers, and at the end of the test, the overall quality of the print really stood out, and what also impressed me was the fact that the reliability of printing multiple prints on the same sheet was also exceptionally good, meaning that if you are producing products, then this is an extremely cheap and easy option. The CFS is really one of the best out there, and the fact that it monitors the internal temperature and acts as a dry case as well all adds to the abilities of this 3D printer. You can, of course, add another to get up to 16 colours, which for a printer that has a base cost of $279 / £279 is exceptionally impressive.
Creality Hi: Design
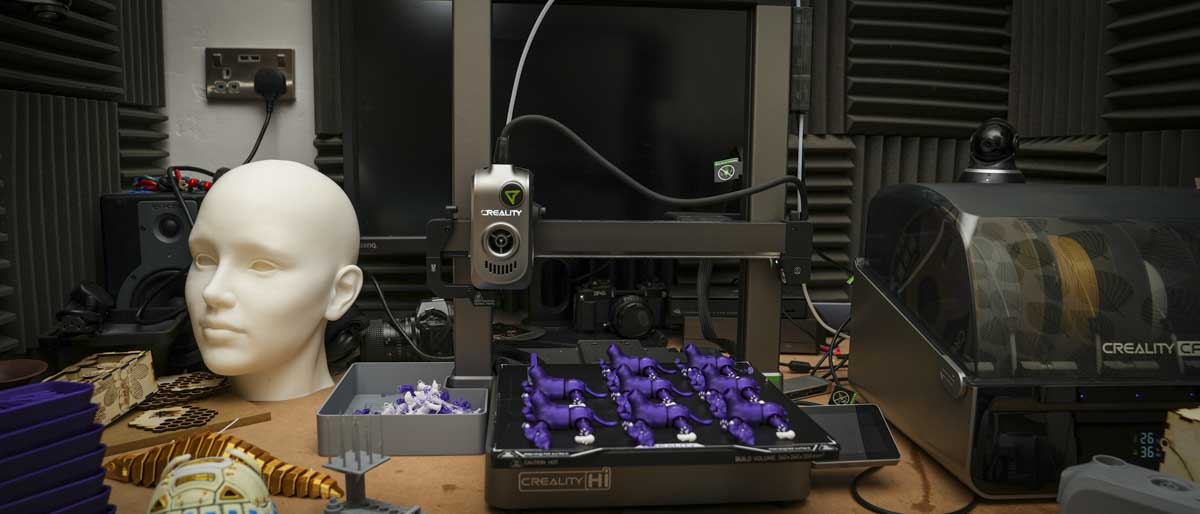
On the surface, the Creality Hi looks like a traditional 3D printer with a two-tower vertical frame and a bed-slinging print platform. However, whilst Creality hasn’t taken it down the core XY route like many others, it has created one of the most robust frames and mechanisms yet at this price point.
It’s worth noting that the build quality across the board has really increased over the last couple of years, and the overall quality of the base machine is exceptionally high.
Likewise, the CFS filament system isn’t a light version. It’s the option that is used across the range and is of exceptionally high quality, enabling the daisy-chaining of up to 4 of these multifilament modules to enable up to 16 colour printing on what is essentially now an entry-level machine.
From the outset, the printer comes almost completely assembled, and it takes 5 to 10 minutes just to secure the bolts before switching it on and allowing the computer to run through the auto-calibration. There is very little manual setup that you need to do.
The one thing that I would note is that it is not the fastest machine to start up and can take up to a minute before the interface is ready to be used, although once loaded, you do have access to the full range of features, and there are no major limitations.
As with most modern printers, there are a few extras which are really nice to see, such as full calibration that happens automatically, and you can opt to have them conduct their checks prior to every print.
Then, there’s the built-in camera so that you can remotely monitor the print without needing to go back to the printer and check it every so often. There are also plenty of connection options, so if you do want to connect through Wi-Fi or you just want to transfer your file by USB, this is perfectly possible.
Creality Hi: Features
There are several different bundles of the Creality Hi that you can purchase: firstly, the base option, which is just a 3D printer; then the 3D printer and the CFS that I’m looking at in this review; and finally, the printer, CFS, and a bunch of filament to get you started. What is surprising is that the discount with each is quite significant, so it is well worth pushing at least to CFS along with the 3D printer, as it’s going to save you a good $100 / £100.
Checking through some of the main features and first and foremost, you have that intelligent CFS, and in this review, I’m looking at the Creality Hi with a single CFS unit, although there is the option to attach up to 4, enabling up to 16-colour printing.
One of the features that many new and not-so-new 3D printers now offer is hands-off calibration. This essentially enables automatic bed levelling and temperature control, and with that, CFS, you also get automatic limit reading, levelling and PA tuning.
Another feature that anyone new to printing will really like is the fact that it’s very easy to get started with the 3D printer essentially coming 95% pre-assembled, so all you need to do is take it out of the packaging, connect a few wires, put in the vertical frame, bolt it down, power it on and you’re essentially ready to load the filament and start printing.
Another big feature is that it features an all-metal body with die-cast parts made of aluminium alloy, which gives a really good, rigid feel, which is needed considering that it has a print speed of up to 500 mm/s and an acceleration rate of 12,000 mm/s². That’s impressive, considering that this isn’t a core XY machine and instead uses tested Cartesian mechanics.
Backing the 3D printer is the Creality Print 5.1 software, which is essentially based on the PrusaSlicer software and enables plenty of settings adjustments that are easy to use and extremely reliable. One of the other features that I really like is that if you’re using RFID filaments, then they’ll be automatically recognised by the system, and that will update Creality Print 5.1 with the correct print type, so you don’t have to go searching around to assign what type of filament you are actually using. This is something that I originally saw in the superb Cel-UK Robox Dual printers.
Another feature of the CFS unit is the fact that it also acts as a dry box, so it will keep your filament in top condition before it goes through to the printer, and again, this helps significantly improve the quality of the print.
When it comes to the printer itself, it has a high-sensitivity sensor, so before and during the calibration process, it uses the strain gauge in the tool head to automatically probe the bed to create an accurate levelling mesh, and this essentially leads to far fewer misprints than many of the systems that I’ve used.
To ensure rigidity, along with the aluminium frame comes dual lead screws, and again, this just adds to the quality and smoothness of the motion control system.
One of the features which can be a little bit annoying but at the same time useful is that the printer has a series of alerts that keep you informed about progress or when something needs attention. Many printers have started to incorporate this, and it can be really useful, but at the same time, when your printer starts beeping constantly due to a clogged nozzle, it can be a little bit infuriating.
One feature that I really like is the new 3.2-inch touchscreen, which is intuitive and the fact that there is a small camera so you can automatically monitor what is printed through the Creality Print app. One of the nice features of the camera is that if you don’t want the camera on, then there is a privacy cap that simply slides over the camera to blur out the view.
Going into a little bit more depth on the printer itself, like many of the latest printers, it features active input shaping, which enables the printer to analyse the amplitude vibrations and compensate for this, which is essential for faster prints. When it comes to the extruder, it now uses metal extruder gears that are ultra-wear-resistant and long-lasting, so it should last you a good few years. Also, as this is a multifilament 3D printer, it features an automated filament cutter inside the head that cuts the filament off between each extrusion so that you get a better match of materials.
Specs
Print Technology: FDM (Fused Deposition Modelling)
Build Area: 260×260×300 mm
Minimum Layer Resolution:
Maximum Layer Resolution:
Dimensions:
Weight:
Bed: Heated, Magnetic PEI Steel Plate
Print Surface: Flexible PEI-coated Steel Sheet
Software: Creality Print (based on PrusaSlicer), compatible with Cura and
other slicers
Materials: Hyper-PLA/PLA/PETG/ABS/PLA-CF
Print Speed: Up to 500 mm/s
Creality also states that the integrated nozzle design is clog-free and quick to swap. In the one clog that did happen, which was 100% due to human error, it was easy to resolve with excellent guides available from Creality, which are well worth mentioning. There’s also a run-out sensor in the extruder, which is able to monitor closely if there are any run-outs or breakages so that filaments can be loaded or switched within the CFS.
New algorithms help with the precision and motion of the printer, and whilst this is a traditional Cartesian mechanics printer, the update enables a big increase in speed up to 500 mm/s and 12,000 mm/s² maximum acceleration, although, in typical scenarios, you’ll probably only go to about 300 mm/s.
Alongside the printer, you have plenty of software support with the Creality Print, which is evolving all the time and now looks great and gives you plenty of options directly through the printer interface. Then you have Creality Print 5.1, which again has evolved to better incorporate the CFS system, and you have Creality Cloud, which is also improving. However, at present, all three don’t talk 100% to each other, so sometimes you’ll have a print in, say, Creality Print, but that won’t appear for use in Creality Cloud; it feels like things are going in the right direction, but could still be slightly better streamlined.
Creality Hi: Performance
Getting set up with the Creality Hi is quick and straightforward, and when they say that this is almost completely assembled, they really mean it. Essentially, you take the whole package out of the box, insert the upright, pop it into position, plug in the cables, bolt in the screws, and then you’re pretty much set to go. Likewise, attaching the CFS is simple, with a single cable coming out of the back of the CFS into the printer and then a single tube also going from the CFS into the print head. Unlike other systems that have multiple tubes, here, Creality has kept things really nice and simple all around, and it’s actually one of the neatest designs that I’ve seen.
My only issue with the design is that the Filament buffer, which is inserted between the CFS and the printer, needs to be stuck onto the vertical with tape; this just feels like a bit of an afterthought for a machine that is otherwise extremely well designed.
Starting out with some test prints, the initial quality is impressive, with single filament prints in line with most other 3D printers at present. However, there is one really interesting feature that only became apparent once the print had finished, and that is the print platform.
With most 3D printers, once the print has cooled, the model can be very easily extracted from the platform; in fact, sometimes, they’re just loose. However, here, it was as though the print was still stuck with glue.
Removing the flexible steel sheet, a flex and a small crack and the print released, and I didn’t think anything much more of it. Then I went back and started to print out more models, and each time, I found that the print was well and truly glued to the platform, clinging on for dear life, and it required a good flex of the print platform to release.
The more I used it, the more impressed I was with the strength of the adhesion that this platform offers, which is far in advance of anything else that I’ve seen, and when it came to really complex prints, you can essentially cut down on the size of the brim used as the adhesion between the print and the print platform is so strong.
Likewise, as the prints are running through the system, you can also tell just how rigid the printer is. It’s relatively small in form factor, but still, compared with older printers along similar design lines, the rigidity of the design really does stand out.
The other thing that was very apparent was that the CFS is just a great design. It’s neat and tidy and keeps everything simple, with just a single cable rather than multiple running into the printer itself. That also stops any tube or cable catches that can sometimes happen as one of those cables gets caught in the mechanics.
The quality of the prints, from single to multifilament, was impressive, with good resolution and quality throughout, with little stringing, and it was obvious the bridging was well-handled.
When I printed the robot turtle, a relatively complex print for multicolour printers and one that even some of the more expensive printers can struggle with, especially when it comes to cleanliness, here the Hi actually produced one of the best-looking robot turtles that any printer I’ve seen produced. However, I’ll also say that it took slightly longer than I initially imagined, at almost 2 days, due to requiring a filament change partway through.
The other thing that I noticed was that whilst I’m now more than used to filament waste piling out by the side of the printer, here next to the Creality Hi, it seemed more excessive, with the weight of the turtle being close to the weight of the waste.
On testing how it was for multiple product prints, again, the prints fared exceptionally well, printing out trays, articulated labradors and GoPro mounts with relative ease in both PLA and PETG, and I noticed that whilst it can print more advanced materials, Creality does state that this printer is designed for more general use materials aimed at the hobbyist and enthusiast market rather than professional.
While the prints all look great, the benchmarking did highlight a small issue with the dimensional accuracy, which was quite off, and while the actual prints looked and, in the case of articulated prints, moved freely, it was obvious that they weren’t quite as accurate as they should have been.
By the end of the test, there was no doubt how impressed I was with this printer, and the benchmark results show just how good it is as a general-use hobbyist machine that will produce some of the best prints for the cost of any 3D printer on the market. When it comes to quality, this is one of the best printers that I’ve used for the price.
Creality Hi: Print quality
Dimensional accuracy – score of 2
Target 25 = X: 24.66mm / 0.34mm Error | Y: 24.56mm / 0.44mm Error
Target 20 = X: 19.80mm / 0.20mm Error | Y: 19.52mm / 0.48mm Error
Target 15 = X: 14.77mm / 0.23mm Error | Y: 14.57mm / 0.43mm Error
Target 10 = X: 9.83mm / 0.17mm Error | Y: 9.64mm / 0.36mm Error
Target 5 = X: 4.72mm / 0.28mm Error | Y: 4.62mm / 0.38mm Error
X error Average = 0.244
Y Error Average = 0.418
X&Y Error Average = 0.331
Fine Flow Control – score of 2.5
Fine Negative Features – score of 5
Overhangs – score of 5
Bridging – score of 5
XY resonance – score of 2.5
Z-axis alignment – score of 2.5
Adding up the totals gives a final score of 24.5 out of 30.
Creality Hi: Final verdict
There is so much to like about the Hi; the design is tried and tested, and the CFS is reliable. It not only keeps your filament in great condition but is also, with the right RFID developments, able to recognise and update the software to the right settings with the filament you’re using, just helping to save time and avoid many print errors.
Whilst, as a whole, the price, the quality and the build, for that matter, are all exceptional, the one thing that does bother me slightly about the design is the ease of cleaning the nozzle; I just felt that it should have been easier than it was, it’s not a big issue as it’s relatively easy to solve and Creality has made a video showing you exactly how it’s done, I just felt it should have been easier.
As a 3D printer for beginners and enthusiasts, this is an exceptional option, easy to use and reliable, and if anything does go wrong, it’s relatively easy to fix with plenty of video tutorials from Creality to help you out. It’s also more suited to beginners, where dimensional accuracy isn’t a huge issue, as while the prints look great, there’s just a little too much difference in dimensions to make this a good fit for anything more professional.
When it comes to single print and multifilament prints, there is no disputing just how good this printer is, even with the amount of waste that multifilament printing always seems to produce. This is an exceptionally good 3D printer.
Should I buy the Creality Hi 3D printer?
| Row 0 – Cell 0 | Row 0 – Cell 1 | Row 0 – Cell 2 |
|
Value: |
Absolutely exceptional value for money, considering the fact that you can boost this up to 16 colours |
5 |
|
Design: |
Generally, a great design, but the amount of waste is an issue |
4 |
|
Features: |
Just about as feature-packed as you can get with CFS, camera and automated bed levelling |
5 |
|
Performance: |
Generally superb performance for single and multicolour; just watch the dimensional accuracy |
4 |
|
Total: |
This is a great entry-level 3D printer with loads of potential as long as you don’t need dimensional accuracy |
4 |
Buy it if…
Don’t buy it if…
We’ve also tested out the best laser engravers.
Read the full article here