Whether you’re using an older card or have one of the best graphics cards available, having the latest graphics drivers installed is important, and for most Nvidia GPU owners, that means Nvidia’s GeForce Game Ready drivers.
New driver releases can offer improved performance and stability, which is why it’s crucial to know how to update them and turn a tedious task into a quick two-minute job. But what if something goes wrong with your latest driver? At that point, it’s good to know how to uninstall it and start fresh with a new installation.
You don’t need to download any third-party tools to update or uninstall your Nvidia Game Ready drivers (although there’s one tool that can be helpful). All you need is a Windows PC and a few minutes of your time. In this guide, we’ll walk you through both processes so that driver updates for your GPU will never be a hassle.
How to update Game Ready drivers with GeForce Experience
Nvidia’s GeForce Experience is the easiest way to update your Game Ready drivers. This is Nvidia’s tool that lets you update drivers, optimize game settings, and even record your gameplay. However, keep in mind that you can’t use it to roll back the drivers.
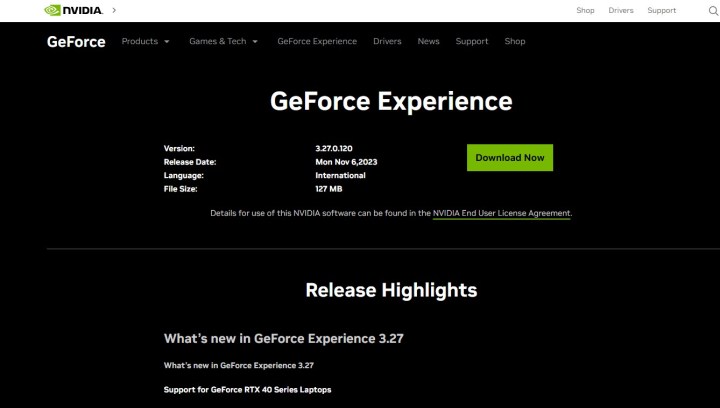
Step 1: Start by downloading and installing Nvidia GeForce Experience from Nvidia’s website. Follow the installation guide and create a user account.
Once installed, launch the tool; it should automatically detect your GPU.
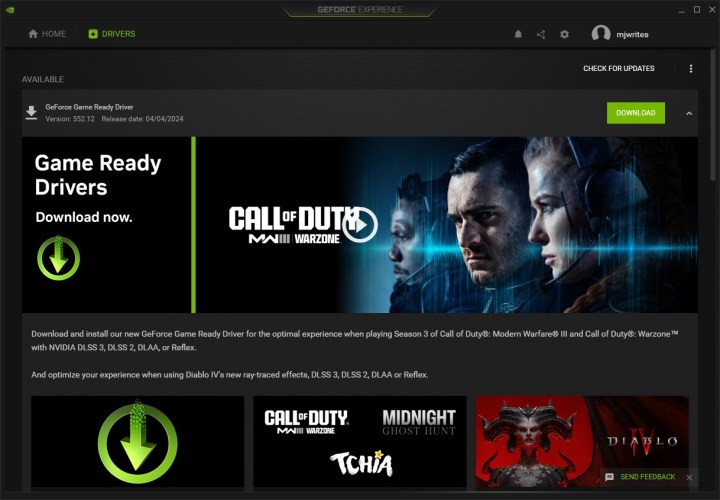
Step 2: Updating your drivers through GeForce Experience is straightforward. At the top-left corner, switch to the Drivers tab. You can then click on Check for updates and let the tool find drivers that match your GPU.
Click on the three vertical dots next to Check for updates and make sure that you’re using the Game Ready driver, not the Studio driver. We recommend Game Ready drivers for pretty much all users who don’t need to use their GPU in professional, creative tasks.
Finally, click on Download to get the driver.

Get your weekly teardown of the tech behind PC gaming
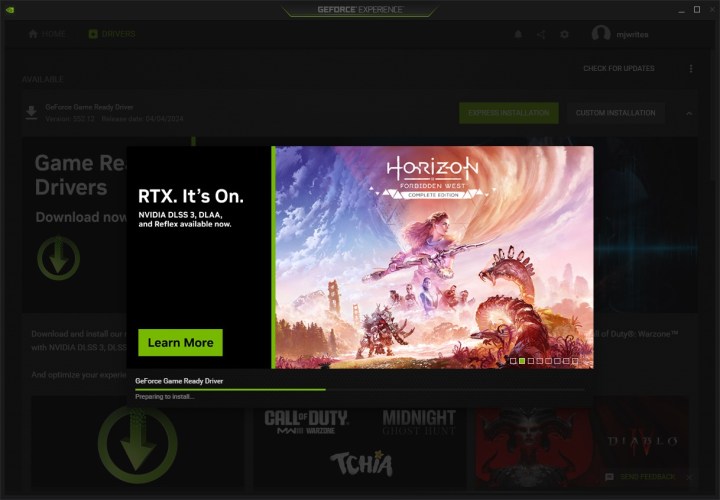
Step 3: Next, you can choose between an Express installation and a Custom installation. The difference is that the Custom option lets you pick whether you want just the graphics driver or any additional software and extra drivers from Nvidia, such as an audio driver. You can also choose to perform a clean installation during this process, which will remove any Nvidia profiles on your PC and restore all settings to their default state.
For most users, we recommend the Express installation. Click on that, and the driver will begin installing. Windows may ask you for extra permissions, so tab into that to grant them.
Don’t worry if your screen turns off a few times during this process — it can happen. After a few minutes, you’re all done — your driver is now up to date.
How to update Game Ready drivers manually
If you don’t want to use GeForce Experience to update your drivers, your other option is to just do it manually. It takes a little bit more time and is less streamlined, though. For starters, you’ll need to know which GPU model you have to make sure that you’re getting the correct driver. We have a separate guide to find out your GPU model. Once you’ve done that, proceed with the steps below.
Step 1: First, head on over to Nvidia’s website. You’ll be presented with several dropdown menus. This is why it’s important to know the exact graphics card that’s in your system, because you’ll need to provide Nvidia with all the information in order to download the drivers. Let’s go over some of the options.
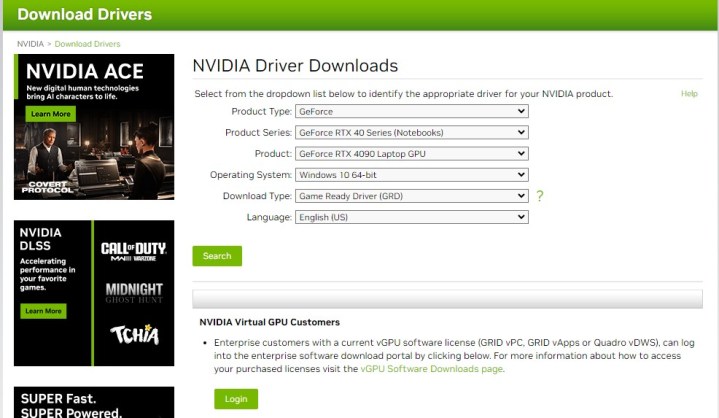
Step 2: Under Product Type, you’ll almost always want to select “GeForce.”
Product Series refers to the generation of graphics cards that you use, but also whether you’re using a laptop or a desktop PC. Product is where you pick the exact model of your card.
Under Operating System, select the version that you use. If you’re not sure, check out our guide on finding out your PC specs.
Finally, for Download Type, make sure to select Game Ready Driver (GRD).
Step 3: Once you’ve downloaded the correct file, launch the installer and select where you’d like it to extract the files. Next, you will be prompted whether you want to install the driver and GeForce Experience or only the driver.
You’re also given the choice between a Custom installation and an Express installation. As above, the Custom installation lets you pick the exact software you’re installing apart from the driver, such as an additional audio driver or PhysX System Software. It also offers to option of performing a clean installation that removes all your previous Nvidia-related settings and profiles.
We recommend using the Express installation for simplicity. Once you choose that, the software will begin installing your new driver. During this process, you’ll see the screen flicker a couple of times; that’s nothing to worry about.
At this point, you’re all done! Your Game Ready driver is up to date.
How to use Add or remove programs to uninstall Game Ready drivers
If, for any reason, you want to uninstall your driver entirely, there are three ways to go about it — using the Add or remove programs feature in Windows, using Device Manager, or using a third-party tool like Display Driver Uninstaller. In this section, we’ll go over the first option, which is a simple way to get rid of your Nvidia driver.
The benefit of using this method is that you’ll be able to also get rid of any accompanying software, while using the Device Manager is limited to just the driver itself.
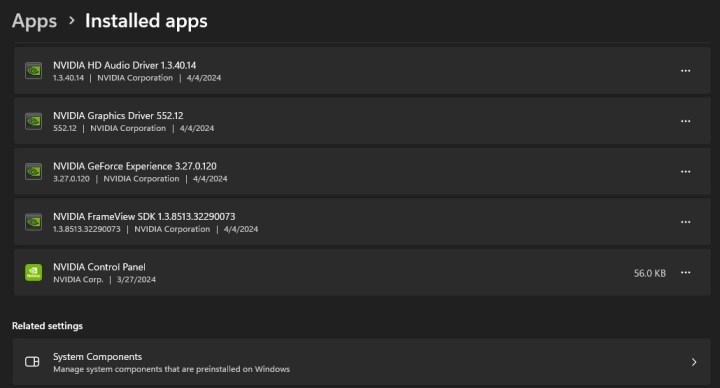
Step 1: First, click on the Windows icon on your taskbar and type in Add or remove programs. Alternatively, you can find this by clicking on the Start menu and clicking on the Gear icon to open Settings, then navigating to Apps, followed by Installed apps.
Step 2: Once you’re in the Add or remove programs section, type Nvidia into the search bar at the top. This will give you a list of Nvidia software that you have installed on your system, including GeForce Experience, the Nvidia Control Panel, and most importantly, the driver.
Step 3: Locate the Nvidia Graphics Driver on the list, then click on the three horizontal dots next to it, and lastly, click Uninstall. Follow the steps in the uninstaller wizard, and if you want to, choose to remove all components of the driver to make this a thorough cleanup. Reboot your PC to finish the process.
Important note: Your PC will now be running on a very basic graphics driver, so you may not be able to use two monitors or your GPU will be locked to the wrong resolution. To fix this, perform a clean driver install by following the steps we outlined above.
How to uninstall Game Ready drivers with Device Manager
Uninstalling the Game Ready driver with Device Manager is easy to do, although it’s not always as thorough as the other two methods we talk about in this article. It’s a simple way to get rid of a driver you’re unhappy with, but also to roll back drivers if you just want to go back to a previous version.
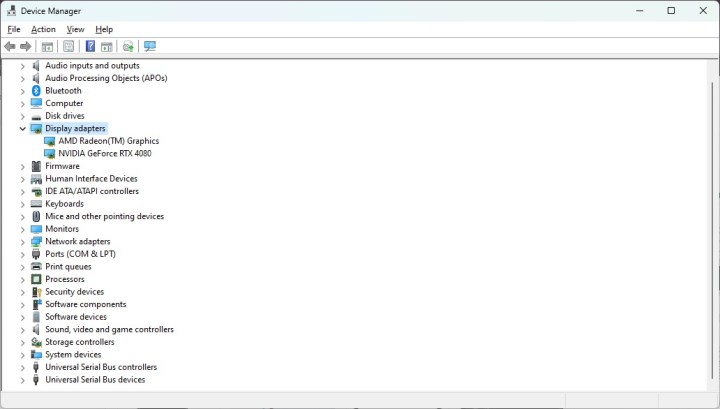
Step 1: Start by opening the Device Manager. The easiest way to do this is to simply right-click the Start button and select Device Manager from the drop-down menu. Alternatively, you can click the Start button and type Device Manager into the search bar.
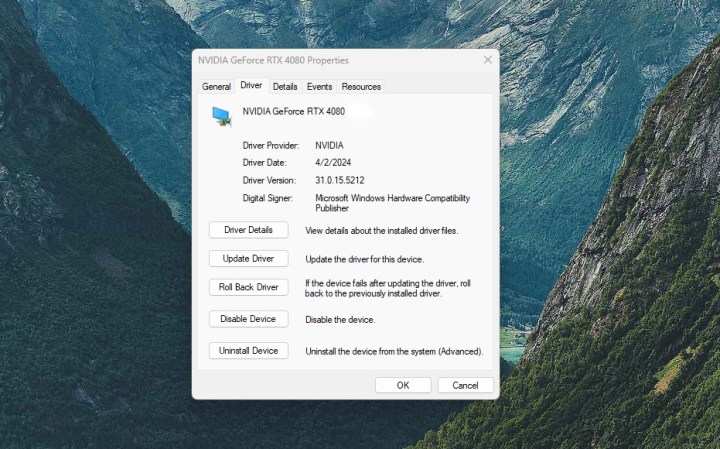
Step 2: Once in the Device Manager, search for Display adapters. This will show you a list of your GPUs, which really just means your discrete graphics card and any integrated graphics you might have that come from your processor. Select the GPU you want to uninstall the driver for, then right-click it and choose Properties.
Step 3: You can now either roll back the driver or uninstall it. To uninstall it, click on Uninstall Device.
A prompt will pop up asking you to confirm that you want to uninstall your GPU, which, in effect, just means removing the driver. If given the option, check the box that says “Delete the driver software for this device” to ensure a complete uninstallation. Click Uninstall to proceed. Reboot your PC to finalize the process.
Remember that your computer will now not have any graphics driver beyond the basic one that’s bundled into Windows. Expect poor performance, low resolutions, and other annoyances until you reinstall your Game Ready driver.
How to uninstall Game Ready drivers with DDU
While driver managers can be risky to use, Display Driver Uninstaller (DDU) is a well-known tool that completely removes all traces of a GPU driver from your system. Using this is a good idea if you want to be extra sure you’re doing a clean install, and this is especially important if you’re buying a new GPU from a different vendor, such as switching from Nvidia to AMD.
DDU works on AMD, Intel, and Nvidia, and it supports Windows 10 and Windows 11.
Step 1: Start by downloading Display Driver Uninstaller directly from the official website and extracting the downloaded file.
Step 2: DDU recommends that you roll back or uninstall your GPU drivers in Safe Mode. If you’re not sure how to do this, here’s how to boot in Safe Mode in Windows 11. (We also have a guide on booting into Safe Mode on Windows 10.)
This can help prevent various software from interfering with the process, and it should also stop Windows from reinstalling your driver for you — which can happen.
Step 3: Once in Safe Mode, navigate to the folder where you extracted DDU and run the application. Close the options menu that pops up — you don’t need to make any changes.
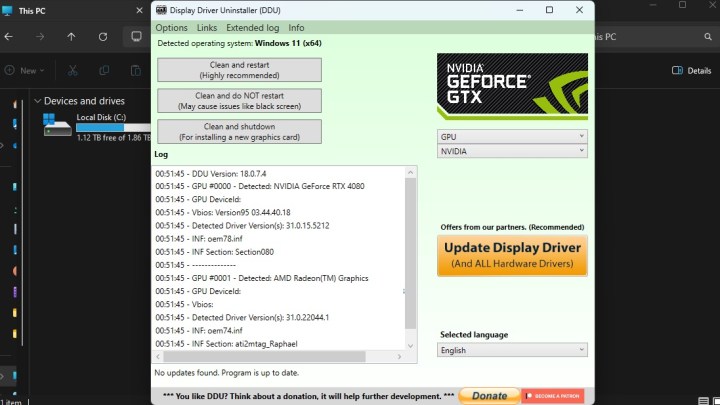
Step 4: On the right-hand side of the screen, you’ll see a dropdown menu that lets you choose your GPU vendor. Pick Nvidia.
Step 5: Now, you can choose one of three options: Clean and restart, Clean and do not restart, and lastly, Clean and shutdown. The option recommended by the program is Clean and restart, which is what you should click on now.
The tool will begin executing various commands and uninstalling all traces of your Game Ready driver. The PC will then automatically restart. At this point, all that remains is to install the Nvidia Game Ready driver once again, as you’ll only be running a very basic graphics driver.
Keep in mind that these steps will only work with Nvidia drivers. If you use an AMD GPU and chipset, check our guide on updating AMD drivers.
Read the full article here


